Showing posts with label Bread. Show all posts

Monday, November 18, 2013

Stuffed Acorn Squash

This blog is no longer actively updated, please visit my new site at MintGrapefruit.com to keep up with new recipes and all the other whats-goings-ons


Thanksgiving is just around the corner, so in keeping with the spirit I decided to test out a few different Thanksgiving types foods. Today I made a Stuffed Acorn Squash with a Maple Syrup Drizzle...doesn't that just make it sound just a bit more fancy...ha.

In our house our stuffing is usually made with sausage, and this mix was no different.  As I was making these, I think they would be great for a leftover meal. Using your leftover stuffing and turkey all mixed together then covered in gravy? I don't see why not!


You are also not limited to using an acorn squash, there are many different types of winter squash that would work great. I used one fairly large acorn squash that if used as a side could feed four or two pretty filling meals.  I ate the smaller half for dinner and was full, I cut the larger half in half and will eat those for lunches this week.

On to the recipe...


Stuffed Acorn Squash with Maple Syrup Drizzle

1 acorn squash
1 cup prepared gluten free corn bread, cubed (I used Bob's Red Mill, and prepared it with soy milk)
2/3 cup sausage
1/2 tsp fresh sage, chopped
1 Tbsp pure maple syrup
1/4 of an apple, chopped

Preheat oven to 400 degrees.

Add one cup of water to a 13x9" baking dish, cut the squash and remove the seeds, place cut side down in the pan. Bake for about 25-30 minutes, just until fork tender.

While the squash bakes, prepare the stuffing. Brown the sausage. Combine all the remaining ingredients in a bowl with the sausage. Mix well.

Remove the squash and carefully empty the water and turn the squash over. Fill the squash with the stuffing mix. Bake for an another 10-15 minutes just until the stuffing browns.

Once removed, drizzle with extra maple syrup. Enjoy!

**For a vegetarian/vegan option, use mushrooms instead of the sausage. If you have a corn allergy, you could easily use a different type of bread or even a grain.

Keep an eye out for a really simple cranberry sauce recipe, coming on Wednesday!

I want to know...
What is your favorite Thanksgiving side dish?

Monday, September 30, 2013

Cornmeal Peach Cake

The summer has come to an end, which means the end of summer fruits and veggies...a sad time for the freshness of summer. However, bring on all the fall goodness!

Towson Farmers Market

Walking through the farmers market the other day, amongst all the apples and the squashes...still remained a few peaches. The last of the late summer peaches. So it wasn't hard for me to decide to pick some up. I will admit, I don't like just eating peaches; the fuzz drives me crazy. But I will bake with them! I haven't made anything real sweet as if late, and a sweet treat was due. This cake is not overly sweet, I believe you could easily make it sweeter by adding a peach glaze...yeah, a nice sweet glaze would make this cake even better. I'll need to get on that.


Making this cake dairy free is easy, I was going to attempt to make it vegan but I have not attempted egg whites and egg yolk replacers...if the eggs were not separated it would be easy to swap them out. If you know a yolk replacement I'd love to hear what you use!


Cornmeal Peach Cake
adapted from Lulu's Sweet Secrets

1/2 cup butter (or coconut oil)
1 cup coconut milk (I used vanilla)
4 large eggs, separated
1 cup sugar
1 cup GF Cornmeal (I used Bob's Red Mill)
1 cup brown rice flour
1/2 tsp xanthan gum
1 tbsp baking powder
2 cups peaches, peeled and chopped
zest of one lemon

In a medium sauce pan, melt butter (or coconut oil), add the milk and simmer over low heat. Keep warm. 
Beat egg whites until soft peaks form, slowly add the sugar. Mix cornmeal, flour, gum and powder in a bowl. Alternating, slowly add the milk mixture and the cornmeal/flour mixture. Combine well.

By hand, stir in the peaches and lemon zest. Pour into a greased and floured cake pan. Bake for about 40 minutes at 450 degrees.


Enjoy! What are some of your favorite ways to use peaches?

Tuesday, September 10, 2013

My Experience and Favorites (Round One): GFAF Expo NJ '13

The Gluten Free & Allergy Free Expo (GFAF) has come and gone. I had the opportunity to meet so many great people and sample some great products. If you follow on twitter or Facebook then I'm sure you saw some of the great products, but I thought I would recap and really share my experiences. Share the products I really loved and link up to those other bloggers I met.

There is so much information out there on gluten intolerance  Celiac Disease, and all the other food related allergies, but even with all the information most people don't fully understand. Most of us that don't eat gluten aren't doing it for a fad, we actually can not eat it. It makes us sick. To some people even just the smallest crumb will cause sickness. As gluten free bloggers (and even other food allergies/sensitivity bloggers) it is up to us to help educate others. I know that I will share my personal experiences and issues at times but I will usually just share a recipe and move on. I am the only one that is gluten free in my family, even extended. So I am only responsible for me, I will usually take full responsibility if I get glutened. I am lucky to have a very supportive family and supportive friends. I am also aware that there is a good chance my son will have issues, I think about it all the time. I don't want him feeling like I did, so for now I just pay attention.


To start off, I want to share a couple of the other bloggers I met.

Gluten Free "Digest" - Tom and Lisa started the blog to help educate the public after their daughter was diagnosed with Celiac Disease in 2012. You can also follow them on twitter (@4glutenfree) or like them on Facebook.

Base on a Sprue Story - Molly shares her "silly and serious stories about celiac disease and gluten-free living", you can also follow her on twitter (@spruestory) or on facebook.


The Frugalista Mom - Rozelyn is a busy mom of four, all with food allergies; she shares recipes, tips, reviews and more! You can also follow her on twitter (@jaydemia) or facebook.

For a list of the bloggers and vendors that you can check out the GFAF Expo's twitter list, here.

Now, on to the products and vendors! First, I would like to say everything is based on my personal opinion... For a full list of vendors and the links to their websites check out the GFAF Expo website, here.

I'm not going to touch on every vendor I stopped and talked to but I will touch on a few of the vendors and products that I really liked. As you may know, being gluten free can prove difficult when there is something that you really crave, something that you really enjoyed (at the time) before going gluten free. A few of mine have been certain pasta dishes and good pizza. So, that being said, I'll start off with some pasta and pizza...(Please don't mind the pictures, they are from Instagram and not the best.)


Favorite Pasta: Conte's Pasta Company - frozen pasta dishes and pizza. They have ravioli, stuffed shells, pierogies, gnocchi and more. I really liked these, the filling had good flavor and the pasta, well the pasta was good for a GF rice based pasta. The key will be how well it reheats..


Favorite Pizza: Against the Grain - Based out of Vermont, the pesto pizza was awesome...the crust was thin and crispy. I can't wait to try some of the other flavors.


Favorite Bread: Okay, this one was hard...so I'm going to break the category up.

Sandwich Rolls- goes to Local Oven, they are based in Texas, the rolls were soft and airy. They lacked the dense dryness of many GF rolls I've tried. The freeze and toast well...I will be advocating getting these in a store near me. 


Baguettes- goes to Everybody Eats from Brooklyn, NY. They also make bagels, but the crunchy outside and soft middle were to die for.


Sourdough- goes to Luce's Artisan Bread, it's the only product I actually bought. It's a mix that you add water and bake, everything is included and the flavor was spot on, the texture perfect.


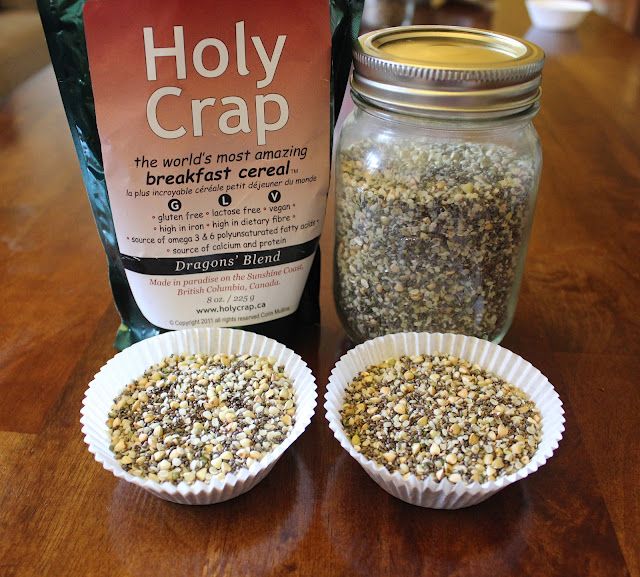
Favorite Breakfast Cereal: Holy Crap Cereal - I have been eating chia pudding for breakfast lately and this cereal totally takes it to another level. Filled with chia, hemp hearts, fruits, and more, just mix with water or your favorite milk and you gave a filling breakfast.


Image Source

Favorite Beer: New Planet Brewery - This was the only true gluten free beer at the expo, there were five different types to try.  I have to admit I did like most of the beers but the flavors of new planet just worked. I am a wine drinker so beer usually isn't my thing, but every now and then I do just want a beer. 


Favorite Cheese: Cabot Cheese- okay to be fair, I think they may have been the only cheese at the expo...but since I am a cheese snob, I was really excited about Cabot. Even though it says it right on their packaging, their cheese is lactose free...so if you are lactose intolerant you can still enjoy the cheese. (Most aged cheese should be okay for us lactose intolerant.)


Favorite Snacks, Cookies, Desserts, and more will be shared in Round Two! Stay tuned...meanwhile check out some of the products from the expo!


Thursday, April 25, 2013

Creamed Chipped Beef and Biscuits {Gluten Free}

I have been craving this...we would always buy the frozen prepackaged versions and those aren't gluten free (go figure).

Growing up creamed chipped beef was always something we had for dinner, over toast and sometimes biscuits, it was never something we had for breakfast.  It wasn't until my family and I went to visit my father-in-law and he made it for us for breakfast that it really sunk in how easy it is to make.  So...I went out and bought some dried beef.  Yup, the stuff in the jar. {Side note: the jars are really nice and can be used for drinking, and the lid just snaps back so good for trips. Less plastic!} 


Since I have been with my husband we have served chipped beef over biscuits more than over toast.  Which personally I prefer, so now I need to make a gluten free creamed chipped beef and gluten free biscuits.  The chipped beef is super simple, I just replaced regular flour with rice flour. 

Creamed Chipped Beef

2-4 oz. package of dried beef* (I used Hormel)
2 tbsp. butter
2 tbsp. brown rice flour
2 cups milk
1/2 tsp. garlic powder
1/2 tsp. onion powder
pepper to taste

*dried beef is salty, so I would recommend rinsing the beef slightly to remove some of the salt.

Prepare beef, slice into bite size pieces and set aside. Melt the butter in a large skillet, once melted whisk in the flour to make a rue.  Slowly add the milk, continuously whisking to keep from getting any lumps. Continue to whisk the mixture until it thicken to your desired consistency. Add the beef and seasonings, once the beef is heated. Spoon over biscuits.


{Cheater} Gluten Free Biscuits

2 cups Gluten Free Bisquick 
1/3 cup shortening
2/3 cup milk or buttermilk
3 eggs

In a large bowl, cut the shortening into the Bisquick.  Mix in the milk and eggs.  Mix well, drop on an ungreased baking sheet. (The size of the drop will depend on how big you want your biscuits, they don't spread much) Bake for about 10 minutes at 375 degrees.  


Enjoy!

Tuesday, April 23, 2013

Bread. Gluten Free, Homemade and Delish


Since being Gluten Free (GF) I don’t eat a lot of bread, I never really have, but occasionally I do crave a sandwich or just a good buttered piece of toast.  A lot of GF breads are dry, dense and expensive.  My personal favorite is Udi’s, it seems a little lighter and has a good flavor, but it still needs to be toasted.  Eating it out of the bag is just too dry for me.  As with a lot of GF breads, I also keep it in the freezer and only remove what I need because at 5-6 dollars a loaf I try to stretch it out as long as possible.  Well this past weekend I decided that I wasn’t going to buy another loaf, I was going to make it. 

The perks of making your own bread it that it tends to be cheaper, makes your house smell good and you know exactly what is in it.  The bad thing, it tends to go bad much quicker, but I slice and freeze it so I don’t have to worry about it going bad before I eat it all. Now…I don’t bake much bread, it is one of those things that I always want to do, but just doesn’t happen much. So I did some searching for GF bread recipes that seem to have good reviews or that just sounded good.  Now that I have a kitchen scale, I am hoping that I will be able to do more experimenting with my own bread recipes, it’s all about ratios.


The recipe I ended up trying was from The Gluten Free Cooking School, I don't have a bread machine so I made it the conventional way and used regular yeast (opposed to bread machine yeast in the recipe).  It turned out great! It had a nice crusty outside and was soft and moist inside.  Even the next day it still wasn't dry or crumbly.  I would highly recommend trying it out, I will definitely be making it again!

For the recipe click here


Links to other blogs that had/have some great information on GF bread making....


*My camera batteries died so I don't have many pictures...and the one shown is from my husbands phone :)

Sunday, March 31, 2013

{GF} Fruit and Nut Muffins


Today is Easter so you would think I would post something Eastery...well, as much as I would have loved to write about homemade peeps, cream eggs, peanut butter eggs, etc.  (Which it is my intention to make every year.) I just never get around to doing it.  This year I felt like Easter snuck up on me...so even though I am making dinner today I decided that I was going to raid my pantry and fridge.  I like having things I can grab in the morning for a quick breakfast. I decided on muffins, I had a mango that needed to be used and various other fruits and veggies.  There are two major changes I would do with this recipe that I wasn't really paying attention to while I was adding all the ingredients.  The first one is the sugar, I would substitute some of the white sugar with some honey or just cut it back all together, depending on the fruit you use you may not need so much. And two, the oil...oh my, as soon as I poured it in the batter I thought "What the hell am I doing!?!" a cup of oil is A LOT, and I have apple sauce and bananas...shame on me!  So at the end of the directions I will let you know the substitution quantities.  


Asking the family what to call these muffins, since Trash Muffin didn't sound so great, I got GFG Muffins. So, here is the recipe..

GFG Fruit & Nut Muffins
(Gluten Free Goodness)

1 1/4 cups sugar
2 1/4 cups gluten-free all purpose flour
1 teaspoon xanthan gum*
1 tablespoon cinnamon
2 teaspoons baking soda
1 teaspoon baking powder
1/2 teaspoon salt
1/4 cup carrots, grated
1/2 apple, peeled and shredded (I would have used a whole, but the one I used happened to be half eaten)
1 mango, diced
1/2 cup blueberries
3/4 cups craisins
1/2 cup zucchini, shredded
1/2 cup chopped pecans
3 large eggs
1 cup vegetable oil**
1 1/2 teaspoon vanilla
ground flax seed


Preheat oven to 350 degrees, prepare a muffin pan with either liners or cooking spray.

Mix together the sugar, flour, xanthan gum, cinnamon, baking soda, baking powder and salt. Set aside.


Combine all the fruit, veggies and nuts in a bowl. (You could use any combination of what you have on hand, but try to keep the moisture levels similar)


Add the fruit and nut mixture to the dry ingredients and stir to combine. Add the eggs, oil**, and vanilla. Mix well.

Pour batter into the prepared muffin pan filling about 3/4 of the way full.  Sprinkle muffins with about 1/4 tsp of flax seed.  Bake for about 20 minutes or until a toothpick inserted comes out clean.

Notes:
*Only add If your flour mixture does not already includes xanthan gum or guar gum.
**Oil substitutions that would be great in these muffins:
   Use 1 cup of unsweetened apple sauce
   Use 3/4 cup mashed ripe banana (about one banana)
   Use 3/4 cup of any other fruit puree or butters
   Use 3/4 cup drained crushed pineapple


**Featured on Gluten Free Tuesday Linky 8/13/2013 with Easy Green Mama**


Friday, November 23, 2012

My First Gluten-Free Thanksgiving (with recipes)

I have to admit I was kind of dreading and excited for this thanksgiving. I love thanksgiving, all the great food that usually triggers memories. I love spending the day with my family, kids running around, drinking wine and eating too much.

Since I have been married we have tried to alternate holidays with both our families, sometimes it works well and sometimes things come up that make it a little harder. There have been a few years where my husband has had to work on thanksgiving and he always has to work the day after so traveling is usually out of the question. This year we did something different and spent the day with our good friends.

Our wonderful hosts!
We didn't realize where we were going to go until a week before, I knew out of our options what I would be able to eat would be limited and therefore had it in my head what I was going to make no matter where we went. Stuffing and gravy. There ended up being about at least 30 people (including kids) so I made two different stuffing's  one that was gluten free and the other was not, but both were very similar.  I also can't do a Thanksgiving without a pie, so I also made a GF Apple Pie. (Recipes below)

GF Apple Pie and GF Pear & Raspberry Cobbler
Buffet Table
The menu included the normal staples for a Thanksgiving meal (or at least what I am used to); there was a 25 lb. turkey, two hams, mashed potatoes, green bean casserole, sweet potato casserole, corn casserole, stuffing, a broccoli casserole, mac-n-cheese and of course pies. The only thing that I missed, that I thought I wouldn't ever miss was cranberry sauce. There was a lot of food, I knew that I couldn't eat most if any of the casseroles but I did taste the sweet potato.  I also brought along my own gravy, which was not the same as homemade with the drippings. 

GF Stuffing with Sausage

Gluten-Free Stuffing with Sausage

(Both stuffing recipes were adapted from my dads traditional stuffing recipe) 

For the gluten-free stuffing:

1/2 loaf GF bread (I used Rudi's)
1 box of GF Cornbread prepared (I used Bob's Red Mill)
1 pound pork sausage (make sure GF, I bought mine from a butcher)
1 cup celery, chopped
1 cup onion, chopped
1 tbsp. fresh thyme
1 tbsp fresh sage
3-4 cups GF chicken broth
3 eggs
Salt and pepper to taste

Prepare the cornbread, (I only used half, save the other half just to enjoy), cube the breads and place on a cookie sheet, bake at 350 degrees for about 15-20 minutes just until dried out, but not brown. Set aside to cool.

Brown the sausage in a large skillet, once it is cooked through carefully remove the sausage to let drain.  Add the celery and onion to the sausage drippings and cook until tender. Add the sausage back to the pan and stir to combine.  Add the thyme and sage.  Add about one cup of the broth and stir picking up any bits that may be left on the pan.  Put sausage mixture aside to cool, just until it can be handled with out burning your fingers.

Once the sausage mixture is cooled, add the eggs and about another cup of the broth, mix well.  I used my hands.  Pour over the bread and toss to combine, depending on how moist you like your stuffing, add a little more broth over the whole dish.  Bake covered at 375 degrees for about 35-40 minutes, uncover and cook for an additional 20-25 minutes.

For the Regular (non-GF) Version; do all of the same except use a whole loaf of old old white bread, or your favorite type of bread, instead of the GF bread.

GF Apple Pie

GF Apple Pie

This is my recipe, it is never the same because I never really measure anything, I will do my best, but the flavors can be adjusted to your liking.

For the GF Crust

2 cups GF All Purposed Four Mix (I used Bob's Red Mill)
1 tsp. Xantham Gum
1/2 tsp. salt
1 and a half sticks of cold butter (3/4 cups), cut into cubes
ice water (about 2-3 tbsp.)

Put the flour, xantham gum and salt in the food processor (feel free to do this by hand but the food processor makes it so easy), add the butter and pulse until the butter in combined. Slow stream in a little of the water, add just about a tsp at a time.  Keep pulsing until dough is formed, remove and separate into two flattened balls, cover in plastic wrap and place in the refrigerator until ready to use.  (You can make this a head to save time)

For the Apple Filling

8-10 medium apples, I usually use a mix of different apples, I have even added firm pears, use what you like.
juice of half a lemon
1 cup white sugar
3 tbsp. ground cinnamon, (more or less depending on your taste)
1/2 tsp. ground nutmeg
1/4 cup apple cider or juice (optional)

Peel and thinly slice the apples. Place the apples in a large bowl, squeeze the lemon over the apples (to keep from browning).  Sprinkle the sugar, cinnamon, and nutmeg over the apples, toss to combine.  If you plan on doing this the day before, add the cider.  Cover and refrigerate until ready to use.  

Prepare the pie, remove the dough from the refrigerator   Roll one dough ball out to about a 1/4 inch thickness, and place on the bottom of the pie pan.  Add the apples, there will be a big mound. Roll out the second dough ball, place on top of the apples and pinch the edged sealing both the top and bottom crust together.  Poke a few hole on top using a fork, you can brush the top of the crust with egg yoke or butter if you would like, sprinkle with cinnamon sugar.

Bake at 375 degrees, for 60-70 minutes.  Cover loosely with foil, remove the foil for the last 20 minutes just to make sure it browns.  You don't want to burn the crust!  Note: You may want to line the bottom of the oven with foil, in case of juice drips.

Now for some random pictures...

My wonderful husband after dinner

Me and my son

First round of after dinner wrestling

Round two


Monday, July 30, 2012

Mom's Meet: Almond Breeze Almondmilk Product Review


Saturday evening was our first Mom's Meet, I think it went pretty well. Like me it wasn't very organized, but we tried some milks and nibbled on food, some people stayed for a cookout after which made for a very nice evening.  

We sampled four different Almond Breeze Milks; Original, Vanilla, Almond Coconut and Almond Coconut Unsweetened.  We tasted and talked about which we liked, which we didn't and why.  Once we were done we filled out a questionnaire that reflected the majority.

Taste was the biggest attribute that we judged by, followed by texture.  It was agreed that the Vanilla had the best taste out of the flavors tried. The Original came in second. We were also in agreement that the Almond Coconut had an unpleasant taste, but it worked really well in the recipes that I made.  So for cooking purposes it was great.  We all agreed that we don't know if we would have a big glass of any of the milks, but then again non of us seemed to drink big glasses of cows milk either (at least those who I asked). So here is a quick break down of the four we tried, in order of best to worse:

1. Vanilla Flavor
2. Original
3. Almond Coconut
4. Unsweetened Almond Coconut

Side note: I didn't pickup the chocolate flavor because they didn't have it our local grocery store, but we all thought the chocolate flavor would probably be really good. I may have to pick up a carton just to try.

As for me, personally, I would and may continue to by the original or vanilla for myself.  It was much cheaper at Trader Joe's then it was at my local grocery store.  Those were I only two stores I priced out, and were almost a dollar different.

The recipes...both were good.  The chicken was really good, even my husband and son enjoyed it. The muffins, I thought could use less almond extract, but were good.

Coconut Cherry Muffins
(from Almond Breeze Almondmilk Coconutmilk Blend Recipe Collection)


1 cup Almond Breeze Vanilla Almondmilk Coconutmilk
½ cup cherry preserves
3 tbsp. melted butter
1 tsp. almond extract (Next time I would use half of this, it was a little too strong for my tastes)
1 egg
2 cups prepared GF baking mix (I used Gluten Free Bisquick)
2/3 cup shredded coconut
½ cup sugar
½ cup dried cherries
Chopped Blue Diamond Oven Roasted Almonds (optional)

Preheat oven to 400*F and spray 12 muffin cups with nonstick cooking spray or line with paper wrappers. Whisk together Almond Breeze, preserves, butter, extract and egg in a medium bowl. Add remaining ingredients stirring just until dry ingredients are moistened. Spoon into prepared muffin cups (they will be very full) and bake for 15 to 18 minutes or until a toothpick inserted in the center comes out clean.


Coconut Curry Chicken
(from Almond Breeze Almondmilk Coconutmilk Blend Recipe Collection)


1 cup Almond Breeze Unsweetened Almondmilk Coconutmilk
1/2 cup minced onion
1/3 cup soy sauce
3 Tbsp. sesame oil
1-1/2 Tbsp. grated fresh ginger
4 tsp. curry powder
1/4 tsp. crushed red pepper (I may use more next time)
6 cloves of garlic, minced
2 lbs. thinly sliced boneless, skinless chicken breasts
Cilantro leaves and sesame seeds for garnish, optional

Place Almond Breeze, onion, soy sauce, sesame oil, ginger, curry, red pepper and garlic in a gallon-size zip top bag; squeeze gently to mix. Add chicken and seal well. Refrigerate for several hours or overnight.  Remove chicken from bag; discard marinade. Grill or broil for about 5 minutes on each side or until nicely charred and cooked through. Sprinkle with cilantro and sesame seeds, if desired.

You can find more recipes on the Almond Breeze website, here.


Sunday, May 6, 2012

Banana Chip Muffins (Vegan)


It seems as if we buy bananas at every trip to the grocery store, we usually eat them all but there are times when we have other fruit that needs to be eaten as well, which in turn leaves uneaten over ripe bananas. In our house once they are super yellow they are too ripe and if there are spots, forget it! I am always looking for something different to make with over ripe bananas, and because I seem to be on this dairy free, vegetarian kick, I am also looking for recipes that fit those catorgories. (Side note: I never throw out over ripe bananas, if I can't use them I freeze them for later.)  Since I made banana bread last time, I decided on a muffin.  This muffin ended up having more of a cake consistancy than a muffin one so it makes it even better.


Banana Chip Muffins

1 1/2 cup all-purpose flour
1 teaspoon baking powder
1 teaspoon baking soda
3/4 teaspoon salt
4 large ripe bananas. mashed
1/2 cup sugar
1/3 cup vegetable oil
1 teaspoon vanilla extract
1 cup carob chips
Cinnamon Sugar for sprinkling on top (optional)

Preheat the ovon to 350 degrees, prepare muffin pan with paper liners or cooking spray.

Mix the flour, baking powder, soda and salt together and set aside.  In a large bowl,  mix the bananas, sugar, oil and vanilla until well combined. Fold in the carob chips.

Fill muffin pan about 3/4 full, decorate with a slice of banana and/or cinnamon sugar. Bake for about 20-25 minutes, or until a toothpick inserted comes out clean.

Sunday, February 19, 2012

Brown Sugar Banana Bread (and muffins)


I have been trying to base my diet on a Low-Residue Diet (LRD), this usually is a temporary thing for me and it is to help with my colitis. But lately I have been trying to find ways to be on the diet and not lose flavor. So what is a LRD?
A low-residue diet is a diet in which fiber and other foods that are harder for your body to digest are restricted. Fiber is made up of plant material that cannot be completely digested by the body. High-fiber foods include whole-grain breads and cereals, nuts, seeds, and raw or dried fruits.
Eating a low-residue/low-fiber diet goes against what nutritionists tout as a healthy way to eat because it severely limits fiber intake and other important nutrients. A low-residue/low-fiber diet usually stays away from grainy, nutty foods that are loaded with fiber.  (webmd.com)
I also stay away from dairy, heavily spiced foods, and as much red meat as possible.  It is a very limiting diet, and frankly I am glad it is usually temporary!  I try to make sure anything I eat has less than 1 gram of fiber...it is difficult.  Especially when it is so ingrained to eat whole grains, fruits and vegetables.  So I have been do some research and finding combinations that are flavorful and work well with the LRD.

The first thing I made was Brown Sugar Banana Bread out of "Eating for IBS" by Heather Van Vorous.  There are a lot of things in this cookbook that would really good but it is written for IBS not IBD, there is a difference.  Anyway, to the bread...the recipe makes two loaf but I only had one loaf pan so I mad one loaf and 12 muffins.


Brown Sugar Banana Bread
(Adapted from Heather Van Vorous)

3 1/2 cups all-purpose white flour
1/2 tsp baking powder
2 tsp baking soda
1/2 tsp salt
6 egg whites (I used egg beaters 100% egg whites)
1/3 cup canola oil (I used vegetable oil)
1 1/3 cup brown sugar (I used Splenda Brown Sugar Blend)
1 Tbsp Vanilla
3 cups mashed ripe bananas (6-8 bananas)

Preheat oven to 350 degrees.  Sift the first four ingredients together in a large bowl.  In a seperate large bowl mix together the remaining ingredents until creamy.  (I left a few banana chunks since I like banana peices in my bread.) Pour into greased pans, bake 50-60 minutes (for loaf), only about 20-25 minutes for muffins. Cool. Extra freezes well.


*If you aren't following any special dietary restrictions...walnuts and/or chocolate chips would be really good in this! 

Enjoy!

Wednesday, September 7, 2011

Blueberries!

This is all about blueberries, and you can tell how behind I am since they really aren't in season anymore...but they were!

In my area of Southern Pennsylvania blueberries were just going out of season but were in full swing in Northern Pennsylvania when we took a long weekend trip to visit my father-in-law. After a morning of feeding the animals at Animal land, my father-in-law, husband and I took our son blueberry picking. The view from the orchard was just beautiful. I wasn't sure how well a toddler (or my husband) would do with picking blueberries for a couple hours but for the most part they did really well. (Until shortly before we left when there was a little too tired melt down.)

Blueberry Orchard

My son probably ate or threw more than what he actually put in the bucket but I sort of expected that. My husband seemed to be enjoying himself, or at least he acted like he was. He even disappeared for a little while, probably to sneak a smoke, but came back with handfuls. I think at the end of the day we ended up with more than 5 pints of blueberries, so we split them with my father-in-law and started thinking of what to make.

Once I got back home, I rinsed and froze all the berries (which are great to munch on frozen). I then decided on making Streusel Topped Blueberry Muffins. As I was making these I was thinking of how good they will be and how I wanted to share the recipe with my father-in-law, well the only problem was he isn’t able to eat processed sugars. So below the original recipe, which is adapted from A Farm Girls Dabbles  recipe for Grandma Renelt's Blueberry Muffins with Crumble Topping, I have posted a couple links for sugar-free blueberry muffins.  It was my intention to make a batch of sugar-free (and still plan on it) I just haven't gotten around to it yet.


**These muffins are best eaten warm and within a day or two.

for the muffins:

1 large egg
1/2 cup milk
1/4 cup vegetable oil
1-1/2 cup flour
1/2 cup sugar
2 tsp. baking powder
1/2 tsp. salt
1/4 tsp. cinnamon
2 cup fresh blueberries (or frozen do not thaw)

for the crumble topping:

1/3 cup sugar
1/4 cup flour
2 T. butter, at room temperature

Preheat oven to 400°. Line muffin tin.
Mix egg, milk, and oil in small bowl. In a large bowl, whisk the flour, sugar, baking powder, salt, and cinnamon. Add the wet ingredients to the dry ingredients and stir. Do not over mix. Fold in blueberries. Spoon into muffin tin and let rest a few minutes while you prepare the crumble topping.

In a small bowl, blend all topping ingredients until crumbly. You want some pea-size pieces of crumble. Sprinkle over muffin batter.

Bake until golden, about 20 minutes.

Yield: 12 muffins

Sugar-Free Muffins:

- Sugar Free Blueberry Cornmeal Muffins
- Sugar-Free Blueberry Muffins
- Primal Coconut Blueberry Muffins

Enjoy!


Sunday, July 24, 2011

Artisan Breads...for the first time


It is so hot here and why I decided to bake bread is beyond me because it did help cool off the kitchen that's for sure!

Today I actually baked off the second loaf from what I mixed up last week. I have been wanting to try to make my own bread for a long time. I have never made a yeast bread by hand. Last week I was looking on Foodgawker, which I love right now, and came across a few different bread recipes. The one I chose to try was off of Chef Dennis's blog. I decided to try this because it seemed to be a large batch and is a no knead dough. One thing you need to remember is read recipes through before you start cooking. I thought I did this but I missed a little which caused me to bake the first loaf the day after I made the dough. There are only 4 ingredients and you need to let it rise on the counter for two hours then in the refrigerator for another three (that is what I missed). The nice thing is they say you can keep the dough in the refrigerator for up to 14 days. The longer it is let to ferment the more sour it will be. So that is why I left half the dough sit until today, a week later.


First batch...
 The first loaf had really good flavor but didn't look very pretty. It had a nice crusty crust and was soft inside. The thing with fresh breads they can go bad much faster than store bought. We ate about half this loaf and I made french toast with the rest.

Basic Cinnamon French Toast
The second loaf was about the same as the first texture wise but I think it looked much better. I couldn't really tell if it was any more sour, it did smell more fermented. This was wonderful warm with butter. I am sure it would have been great with olive oil, salt and rosemary but I didn't think about that before hand.


Second Batch

Follow this link to the recipe... Artisan Bread and Pizza


I will make bread again, I will probably try a different recipe just to try something new.