Wednesday, November 20, 2013

{Simple} Cranberry Sauce

This blog is no longer actively updated, please visit my new site at MintGrapefruit.com to keep up with new recipes and all the other whats-goings-ons


Cranberry sauce is a staple at our thanksgiving table, and I’m not going to lie…I really prefer the can. I know, I know, but it just works on so many levels, as wrong as it is and I think about it every time I turn the can over and just hear it fall out on to the plate.  This year I decided to play around a bit and come up with a new cranberry sauce that could be used at the table…in addition to the can of course.


This only uses a few fresh ingredients, and is really quick to prepare. You could adjust the sweetness to your liking, you could even add nuts if you like a little crunch.

1 bag fresh cranberries, rinsed
1 cup tangerine juice (about 6 tangerines*)
1 apple
4 tbsp. honey
¼ cup raw sugar (more or less depending on your tastes)
*1 tsp. xanthan gum (optional)

Combine all ingredients in a pot, along with ¾ cups of water. Bring to a simmer. Simmer until you have the texture you would like. Stirring occasionally. If you would prefer a thicker consistency, add the xanthan gum. Mix well. Sauce will thicken slightly as it cools; can be eaten warm or chilled.


*You could use store bought juice or any type of orange. I just happened to have a lot of tangerines on hand.

Monday, November 18, 2013

Stuffed Acorn Squash

This blog is no longer actively updated, please visit my new site at MintGrapefruit.com to keep up with new recipes and all the other whats-goings-ons


Thanksgiving is just around the corner, so in keeping with the spirit I decided to test out a few different Thanksgiving types foods. Today I made a Stuffed Acorn Squash with a Maple Syrup Drizzle...doesn't that just make it sound just a bit more fancy...ha.

In our house our stuffing is usually made with sausage, and this mix was no different.  As I was making these, I think they would be great for a leftover meal. Using your leftover stuffing and turkey all mixed together then covered in gravy? I don't see why not!


You are also not limited to using an acorn squash, there are many different types of winter squash that would work great. I used one fairly large acorn squash that if used as a side could feed four or two pretty filling meals.  I ate the smaller half for dinner and was full, I cut the larger half in half and will eat those for lunches this week.

On to the recipe...


Stuffed Acorn Squash with Maple Syrup Drizzle

1 acorn squash
1 cup prepared gluten free corn bread, cubed (I used Bob's Red Mill, and prepared it with soy milk)
2/3 cup sausage
1/2 tsp fresh sage, chopped
1 Tbsp pure maple syrup
1/4 of an apple, chopped

Preheat oven to 400 degrees.

Add one cup of water to a 13x9" baking dish, cut the squash and remove the seeds, place cut side down in the pan. Bake for about 25-30 minutes, just until fork tender.

While the squash bakes, prepare the stuffing. Brown the sausage. Combine all the remaining ingredients in a bowl with the sausage. Mix well.

Remove the squash and carefully empty the water and turn the squash over. Fill the squash with the stuffing mix. Bake for an another 10-15 minutes just until the stuffing browns.

Once removed, drizzle with extra maple syrup. Enjoy!

**For a vegetarian/vegan option, use mushrooms instead of the sausage. If you have a corn allergy, you could easily use a different type of bread or even a grain.

Keep an eye out for a really simple cranberry sauce recipe, coming on Wednesday!

I want to know...
What is your favorite Thanksgiving side dish?

Wednesday, November 6, 2013

An Exchange in Health & Nutrition

Willa with her mother Grace 
I had the opportunity to meet and exchange time with Willa Lefever from Sonnewald Natural Foods to talk about my health and nutrition, what was only going to be an hour turned into three. Even though I have been to the store a few times, I didn't really meet Willa until I attended our local time bank meeting. I had a great afternoon listening to her thoughts on helping my body heal, as well as learning a little more about her. Then I proceeded to help her try to understand and learn the banking software. Willa isn't a certified nutritionist but has grown up around natural foods and natural wellness, she did pass on information for a former employee who is, if I feel the need for a more in depth meeting. 

Before our meeting I kept a food journal as well as filled out a questionnaire  these were given to her in advance so she new some of the habits and history before hand. It went beyond food and into my lifestyle, am I living my passion, stress factors, etc. The top three biggest factors, that Willa came up with, were not working within my passion, stress and my water intake. I know I don't drink enough water, I'm not sure why, I guess I just don't think about it, until my lips are dry and my head hurts, I love water. 

That being said, number one is I need to drink half my weight (in oz.) of water, which comes to around 80 oz. a day. Right now my goal is to drink closer to 64 oz. trying to drink 32 oz. before lunch and another 32 oz. after lunch. One trick she mentioned was adding about two tablespoons of chia seeds to one quart of water, the chia will act as little sponges and help some of the water be absorbed into your body opposed to just flushing through. Plus they will add extra fiber and nutrients. 

Number two, she wants to to do some sort of stress relieving activity. Anything. Start exercising, yoga, painting, anything that will help ME reduce my stress levels. I haven't been very active as of late, I also haven't had the opportunities to paint or draw, I will just need to find some time to squeeze in something. (Does this count? I think the time I'm blogging is usually stress free, for the most part.)

And three, the first thing she said when I met with her wasn't hi, hello or how are you...it was oh honey we need to get you doing something you are passionate about. I just smiled. I know my job isn't my passion (as does anyone who knows me) but there are restrictions and obligations that can't be ignored. Depending on who you talk to those things may not matter. But, I recently took a position as the Training Coordinator for the Special Olympics York County and will also have an opportunity to help with a new program that will offer art classes to athletes. My hope is this will help with balancing my work and passion. 

With those being her top three that I need to work on, we then talked food. Until I'm healed, she suggested no dairy and possibly trying a grain free or Paleo diet. She also suggested no coffee or refined sugars. And absolutely no GMOs, or at least as little as possible. (Which I completely agree with.)

Some of her suggestions: 

  • Use local raw honey instead of the refined sugars
  • Use Dandy Blend or other teas instead of coffee (it's the acidity of the coffee that is harmful)
  • Once healed eat only raw grass feed cheeses, if my body tolerates them
  • Vegetables! Lots and lots of COOKED vegetables! (Juiced is okay)

She also suggested a few supplements, I already take medication regularly for my UC but she explained how that helps with the symptoms and keeping it at bay or in remission but it doesn't really heal the damage that has already been done to my colon. So, what she has suggested is to help heal the damage.

Supplement suggestions (from most recommended to least):

  • Probiotics
  • Vitamin D3 (which I already take since I am aware I am very deficient) 
  • Fish Oil
  • Aloe Vera (George's)
  • Minerals & Trace Minerals (I'm consistently craving salt)

She also told me about Intestinew by Renew Life, it is made specifically for UC. I may need to look into it, I would prefer natural over synthetic any day. 

I would recommend checking out Sonnewalds website, there is all kinds of helpful resources on there. Her famous Restoring Life Soup is also on the website, it is a healing soup that is easy on digestion and very nutritious, made using veggie purée and bone broth.


I hope to post a follow up in a few weeks, I have started taking probiotics in addition to my D3 and regular medication. I hope to get fish oil soon, and possibly try the Aloe Vera (I have alway heard good things about it). I have been pretty good with water so far, I carry my Nalgene bottle with me everywhere. I haven't changed my diet too much as of yet, I plan on changing something's up shortly. I just need to come up with a few lists and do some planning.

I would love to hear from you:

Have you ever taken any of these supplements to aid in your UC or maybe just to aid in digestion?  

Do you think Paleo is worth it?


Friday, October 11, 2013

Sweet Potato Soup: Perfect for a rainy day

It's fall! Yay! The air is crisp and cool and it's the start of super comforting foods! Plus, I don't know about where you are, but here it is raining...and raining and frankly a perfect soup day.


I had lots of help with this soup, I had the pleasure to watch our friends four kids. I don't know about you but when I have a house of kids I put them to work! Okay, not really, they were excited to help. The older two even helped me paint the deck earlier this summer.


Anyway, I had five kids and was planning on making a soup so when I asked if anyone would be interested in helping all of them said yes. I separated the tasks, most of which involved chopping and put them to work. (And don't worry, I watched them all carefully.)


Coming up with soups can be fun, I had a ginormous sweet potato so it was an easy decision to make that the primary ingredient. Everything else just can through tasting.


Sweet Potato Soup

1 large sweet potato, peeled and cubed
3 medium russet potatoes, cubed
3 medium carrots (about 1-1/2 cups), chopped
1 medium onion, diced
3 stalks celery, chopped
1 large garlic clove (or 3 normal size), peeled and minced
2 tbsp. fresh thyme
2 tbsp. curry powder
1 tbsp. turmeric powder
1 tsp. cumin powder
1 jalapeño, minced
8 cups water
Juice of 1/2 lemon
Salt and pepper to taste
Optional: sour cream and sriracha 

Melt butter in a large stock pot, add chopped carrots, onion and celery, sprinkle a little salt over the veggies and sauté for about five minutes, cover until veggies are soft. Add garlic, thyme and jalapeño. Stir.

Add water and potatoes. Bring to a simmer and add the remaining spices. Continue to simmer until potatoes are fork tender. Using a blender or using an emulsion blender, blend half the soup. (Blending adds a creamy texture to the soup.) Stir soup and adjust seasoning to your taste. Pour into a bowl and garnish with sour cream and sriracha.

Hopefully you enjoy this as much as I did, I'd love to hear your thoughts!

Monday, September 30, 2013

Cornmeal Peach Cake

The summer has come to an end, which means the end of summer fruits and veggies...a sad time for the freshness of summer. However, bring on all the fall goodness!

Towson Farmers Market

Walking through the farmers market the other day, amongst all the apples and the squashes...still remained a few peaches. The last of the late summer peaches. So it wasn't hard for me to decide to pick some up. I will admit, I don't like just eating peaches; the fuzz drives me crazy. But I will bake with them! I haven't made anything real sweet as if late, and a sweet treat was due. This cake is not overly sweet, I believe you could easily make it sweeter by adding a peach glaze...yeah, a nice sweet glaze would make this cake even better. I'll need to get on that.


Making this cake dairy free is easy, I was going to attempt to make it vegan but I have not attempted egg whites and egg yolk replacers...if the eggs were not separated it would be easy to swap them out. If you know a yolk replacement I'd love to hear what you use!


Cornmeal Peach Cake
adapted from Lulu's Sweet Secrets

1/2 cup butter (or coconut oil)
1 cup coconut milk (I used vanilla)
4 large eggs, separated
1 cup sugar
1 cup GF Cornmeal (I used Bob's Red Mill)
1 cup brown rice flour
1/2 tsp xanthan gum
1 tbsp baking powder
2 cups peaches, peeled and chopped
zest of one lemon

In a medium sauce pan, melt butter (or coconut oil), add the milk and simmer over low heat. Keep warm. 
Beat egg whites until soft peaks form, slowly add the sugar. Mix cornmeal, flour, gum and powder in a bowl. Alternating, slowly add the milk mixture and the cornmeal/flour mixture. Combine well.

By hand, stir in the peaches and lemon zest. Pour into a greased and floured cake pan. Bake for about 40 minutes at 450 degrees.


Enjoy! What are some of your favorite ways to use peaches?

Tuesday, September 10, 2013

My Experience and Favorites (Round One): GFAF Expo NJ '13

The Gluten Free & Allergy Free Expo (GFAF) has come and gone. I had the opportunity to meet so many great people and sample some great products. If you follow on twitter or Facebook then I'm sure you saw some of the great products, but I thought I would recap and really share my experiences. Share the products I really loved and link up to those other bloggers I met.

There is so much information out there on gluten intolerance  Celiac Disease, and all the other food related allergies, but even with all the information most people don't fully understand. Most of us that don't eat gluten aren't doing it for a fad, we actually can not eat it. It makes us sick. To some people even just the smallest crumb will cause sickness. As gluten free bloggers (and even other food allergies/sensitivity bloggers) it is up to us to help educate others. I know that I will share my personal experiences and issues at times but I will usually just share a recipe and move on. I am the only one that is gluten free in my family, even extended. So I am only responsible for me, I will usually take full responsibility if I get glutened. I am lucky to have a very supportive family and supportive friends. I am also aware that there is a good chance my son will have issues, I think about it all the time. I don't want him feeling like I did, so for now I just pay attention.


To start off, I want to share a couple of the other bloggers I met.

Gluten Free "Digest" - Tom and Lisa started the blog to help educate the public after their daughter was diagnosed with Celiac Disease in 2012. You can also follow them on twitter (@4glutenfree) or like them on Facebook.

Base on a Sprue Story - Molly shares her "silly and serious stories about celiac disease and gluten-free living", you can also follow her on twitter (@spruestory) or on facebook.


The Frugalista Mom - Rozelyn is a busy mom of four, all with food allergies; she shares recipes, tips, reviews and more! You can also follow her on twitter (@jaydemia) or facebook.

For a list of the bloggers and vendors that you can check out the GFAF Expo's twitter list, here.

Now, on to the products and vendors! First, I would like to say everything is based on my personal opinion... For a full list of vendors and the links to their websites check out the GFAF Expo website, here.

I'm not going to touch on every vendor I stopped and talked to but I will touch on a few of the vendors and products that I really liked. As you may know, being gluten free can prove difficult when there is something that you really crave, something that you really enjoyed (at the time) before going gluten free. A few of mine have been certain pasta dishes and good pizza. So, that being said, I'll start off with some pasta and pizza...(Please don't mind the pictures, they are from Instagram and not the best.)


Favorite Pasta: Conte's Pasta Company - frozen pasta dishes and pizza. They have ravioli, stuffed shells, pierogies, gnocchi and more. I really liked these, the filling had good flavor and the pasta, well the pasta was good for a GF rice based pasta. The key will be how well it reheats..


Favorite Pizza: Against the Grain - Based out of Vermont, the pesto pizza was awesome...the crust was thin and crispy. I can't wait to try some of the other flavors.


Favorite Bread: Okay, this one was hard...so I'm going to break the category up.

Sandwich Rolls- goes to Local Oven, they are based in Texas, the rolls were soft and airy. They lacked the dense dryness of many GF rolls I've tried. The freeze and toast well...I will be advocating getting these in a store near me. 


Baguettes- goes to Everybody Eats from Brooklyn, NY. They also make bagels, but the crunchy outside and soft middle were to die for.


Sourdough- goes to Luce's Artisan Bread, it's the only product I actually bought. It's a mix that you add water and bake, everything is included and the flavor was spot on, the texture perfect.


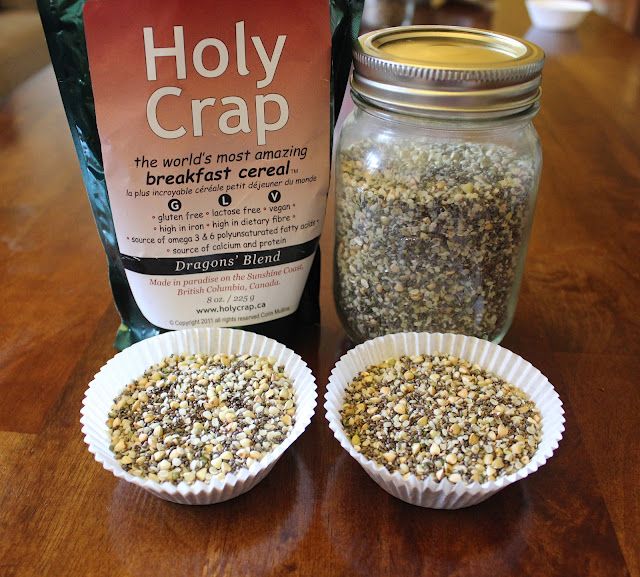
Favorite Breakfast Cereal: Holy Crap Cereal - I have been eating chia pudding for breakfast lately and this cereal totally takes it to another level. Filled with chia, hemp hearts, fruits, and more, just mix with water or your favorite milk and you gave a filling breakfast.


Image Source

Favorite Beer: New Planet Brewery - This was the only true gluten free beer at the expo, there were five different types to try.  I have to admit I did like most of the beers but the flavors of new planet just worked. I am a wine drinker so beer usually isn't my thing, but every now and then I do just want a beer. 


Favorite Cheese: Cabot Cheese- okay to be fair, I think they may have been the only cheese at the expo...but since I am a cheese snob, I was really excited about Cabot. Even though it says it right on their packaging, their cheese is lactose free...so if you are lactose intolerant you can still enjoy the cheese. (Most aged cheese should be okay for us lactose intolerant.)


Favorite Snacks, Cookies, Desserts, and more will be shared in Round Two! Stay tuned...meanwhile check out some of the products from the expo!


Wednesday, August 28, 2013

Stuffed Poblanos

If you know me, you know I have a special place in my heart for all things Mexican; and these last few days I have had my fair share of nachos, enchiladas, tacos and now...Stuffed Poblanos.  I was alone last week while my son and husband were off visiting my father-in-law, and I ate (or drank) Mexican everyday. Mostly in the form of nachos. If you are one to mix flavors, I am a big fan of Trader Joes Paneer Tikka Masala, and I must say...put it on top of tortilla chips and then cover in cheese, oh its heaven. {Everything is better with cheese...lots of cheese!}


I try to use fresh from the garden or from the farmers market during the summer, as much as possible. We have had a lot of tomatoes but they never got very big, and we have had jalapenos out the wazoo. I have made salsa and will probably be making more...but I wanted to make something different, vegetarian (I was going to go vegan, but that damn need for cheese gets in the way every time) and with Mexican flavors. Realizing that going vegetarian probably meant that I would be the only one eating it, also meant I can make it how I would like to make it.  So...other than the items from our garden I stopped at the farmers market on my way home from work and while ogling over all the peppers, the decision was made...I must stuff them. 

Now...I am not against the use of meat in this dish, so you could easily add ground beef or turkey, shredded chicken or what ever you fancy. I was just in the mood for meatless...which tends to be more often than not. 


3-5 Poblano peppers

Filling:
1/2 cup rice
1/2 cup quinoa
1 can black beans
1 ear of corn
5-6 small tomatoes, quartered
2 jalapenos, sliced in half lengthwise
1 medium onion, roughly chopped
1 clove garlic
1 tsp ground cumin
1/4 tsp ground turmeric
1 tsp chili powder
1/2 tsp cayenne powder
1 cup cheddar cheese, shredded

Topping
Roasted tomato sauce, recipe below
Shredded cheese
Chopped cilantro

Cook the rice and quinoa as directed, set aside.  Meanwhile, place the corn, tomatoes, jalapenos, onion and garlic on a baking dish, roast the veggies just until soft. Place under the broiler on low heat, tossing at least once. Remove and cool slightly, so you are able to handle them, chop everything up and remove the kernels from the ear of corn. Add to a large bowl, add the rice, beans and spices; mix well.  Mix in the cheese.

Carefully remove the top of the poblano peppers, I cut around the stem and then twisted and it pulled most of the seeds out, you may need to do a little seed clean up. Spoon the filling into the peppers, make sure to push it down as far as possible. Lay the peppers in a shallow baking dish. Cover is sauce and cheese. Bake for about 40 minutes at 350 degrees.


Roasted Tomato Sauce
2 jalapenos
1 small onion, quartered
3 garlic cloves
3-4 cups tomatoes, I used a combination of small ones from my garden and cherry tomatoes from a market
1-2 tsp chili powder
1/2 tsp ground cumin
1/4 tsp cayenne powder

Add all the vegetables to a pan and roast under the broiler until soft and slightly charred. Once they are done, add to the food processor with the spices and blend until smooth. Store in a tight lidded container in the refrigerator.

So yummy! Enjoy it!

Sunday, August 25, 2013

Thai {inspired} Coconut Soup


A few months back we had a girls night that started with dinner at Veit Thai, then of course followed by drinks. Ever since, I keep thinking of Thai and the spicy, sweet combinations.  Then at one of our local time bank* meetings, my friend fed me shared with me more of those wonderful spiciness. So here I am trying to come up with a dish that can satisfy the craving.

And if you are reading this Grace, we need to go back! 

So here is my take on a Thai inspired Coconut Soup, with sweet potatoes and mushrooms.


1 sweet potato
1 small eggplant
8-10 shiitake mushrooms, sliced
3 cloves of garlic, minced
1 qt Vegetable Broth
1 can Coconut Milk
2 jalapenos, minced
1 stalk of lemongrass, sliced thin
1 tbsp fish sauce
1 green onion, sliced
1 tsp curry powder
1/2 tsp crushed red pepper
1 cup cilantro, chopped
Sriracha to taste

Chop the sweet potato, eggplant and slice mushrooms, add to stock pot. Cook just to soften in about 1 tbsp each coconut oil and olive oil. Once soft, add the broth and milk. Bring to a simmer.

Add all remaining ingredients, up to the cilantro. Let simmer. Add the cilantro and add sriracha to taste. 

Eat it alone, or serve over rice or rice noodles.


*I am part of our local time bank, York County Time Bank. We currently have close to 70 active members and growing. We are a new bank, but if you are local and interested you should check it out! Or if you are interested in finding out more information or to see if there is a time bank in your community you can check it out here at hOurworld or at TimeBanks USA.

{Recipe shared on Easy Green Mama, Gluten Free Linky for August 27, 2013}

Saturday, August 10, 2013

Latest Struggle...

I'm going through a bit of a hard time. I'm struggling with issues, trying to make sense of things that really make no sense. I have been uncomfortable for days, unsure of what is causing it. Food? Stress? Anxiety? I don't know. What I do know is I really want it to stop. A few weeks ago I went to get the results from my last procedure...I went in with high hopes, I haven't been having any symptoms and I have been feeling great. What I was told was that instead of being better, or dormant, my UC is in fact spreading; getting worse without actually showing external symptoms. I really don't understand, and perhaps I'm not supposed to. I feel like I'm in a rut, just can't get out. I am really trying to stay positive and happy, I know I can only control so much...

It was suggested that perhaps I should keep a food journal. Keep track of food that might trigger certain symptoms. I know there are foods beyond gluten that I should probably ween out of my diet. Dairy and beef being two big ones, and honestly the beef is easy...dairy not so much. I buy dairy free milk, my son ends up drinking most of it, which is okay I don't mind since I don't really drink much. I also, really need to take my medication. I am SO bad with taking pills. Especially when I feel fine. (Speaking of which, I haven't taken them yet today.) But I need to take my medication, I have three different types I take now; plus two others to take when I am having bad symptoms. I think there are about 5 different medications right now. Ugh...just writing that out sucks.

I am gluten free, it has made me feel so much better. I believe, and my doctor agrees, that I have a sensitivity on top of the UC, as well as probably being lactose intolerant...yes right now I am totally bummed. I love food, I have changed so much to make myself feel better, to feel normal; and I feel really good...or I was. I am just so confused.

-------

I appreciate you listening, I just needed to get this off my chest. I'm sure my husband is tired of hearing about it, even though he will sit and listen like he knows what I'm going through. I'm not sure he really understands, just like most people who don't deal with it. So, I have attached some links that may be helpful.

Crohns & Colitis Foundation of America (CCFA)
National Foundation for Celiac Awareness
Ostomystory Channel (I'm not here, but it is really interesting, she is so strong)

I want to cry...I haven't had a venting post like this in a while...

Sunday, August 4, 2013

Pickles!

This was the first year I didn't plant cucumbers in my garden, but I was lucky enough to have a friend with too many, so when I mentioned I'd be happy to take them off her hands she was more than willing and gave me a bag full! And what do you do with a bag full of cucumbers? Pickles of course!


There are a lot of pickling recipes out there, as well as a lot of different types of pickles, some use prepared pickling spice, some do not.  I made both dill and bread and butter, using my own pickling blend.


A lot of sites mention soaking the cucumbers in a salt solution, I did not do that. I am still not 100% sure why you would need to do that. If you know please feel free to share. I also learned if you add a little Alum to the dill brine it will keep the pickles crisp. I, however, didn't know this trick before I made my dill batch.


Dill Pickles

This will make enough for about 4 pint jars, I almost tripled the brine in order to use all the pickles. Ending in about 8 pints worth.

10-15 pickling cucumbers* (about 4-5" in length)

For the brine:

2 1/2 cups water
2 1/2 cups vinegar
3 tbsp raw cane sugar
3 tbsp coarse sea salt
2 tbsp whole coriander seeds
2 tbsp whole peppercorns
2 bay leaves
4 garlic cloves
Fresh dill (I used a few sprigs per jar)

Slice the cucumbers in about 1/4" rounds (you can also cut into spears) Fill the sterilized jars with the cucumbers, and a few sprigs of dill. Set aside. Add all the brine ingredients in to a large pot, bring to a simmer. Once all the salt is dissolved, pour the hot liquid into the jars. (I try to make sure at least one garlic clove makes it into each jar.)


Add ins: I added a sliced jalapeño to a couple jars, you could also add crushed red pepper, or other peppers or more garlic.

Bread and Butter Pickles
(Recipe adapted from The American Woman's Cook Book, 1966)

8 medium cucumbers*
1 large onion**
1/2 cup salt
2 cup sugar
3 tsp mustard seed
3 tsp celery seed
1 tsp curry powder
2 cups vinegar, white
1 cup water

Slice the cucumbers and onions, lay the onions out on a paper towel and sprinkle with salt. (This will drain some of the liquid from the onion.)


In a large sauce pan, add the remaining ingredients bring to a simmer. Once all the sugar and salt is dissolved, add the onions and cucumbers. Simmer for about 10 minutes. Pack into sterilized jars.


*The original recipe called for about 12 medium cucumbers, this will vary depending on the size of your cucumbers.
**The original recipe called for 5 medium onions, that just seemed like a lot so I reduced the amount.


Processing the Jars

This will be the same for both types of pickles. To sterilize the jars and lids, boil in a large pot of water. I will usually have the jars boiling while I slice and prepare all the ingredients. That way when I pack the jars they are still hot. Once you fill the jars, you want about a 1/2 inch of head space. (The amount of space between the very top of the jar to the liquid.) Place the lids on the jars, don't screw them on real tight, just enough so no extra liquid will be able to get in. Place the jars into boiling water, the water should just cover the jars. Process or boil for about 10-15 minutes. Carefully remove the jars and set aside to cool, as the jars cool you will start hearing popping which is what happens when the jars seal. Gentle press the center of the lids, if you are still able to press it down, it didn't seal. You can try processing them again, as long as they didn't cool down too much, or just place in the refrigerator. Processed pickles should last about a year in a cool dark place. Refrigerate after you open them.

For the dill pickles, if you didn't want to process the jars you could store in the refrigerator for about 6 months, just wait at least 24 hours before enjoying them.

Thursday, June 20, 2013

GFAF Expo and an Early Summer Treat


Come September 7th I will be one of the lucky bloggers to be attending the Gluten Free and Allergen Free Expo (GFAF) in Secaucus New Jersey! This is an exciting opportunity for me to meet other bloggers and to check out and share all kinds of products. I am looking to expanding my knowledge, growing as a blogger and sharing it with you! 

The expo will consist of over 150 vendors sharing their gluten and allergen free products, as well as numerous bloggers and writers sharing their experience. My plan will be to live tweet and blog my experiences throughout the day. I will be using the hash tag #gfafexpo as will other bloggers and visitors so if you aren't able to attend you can follow along on all the social networking sites. Check out their website, here.  

But until then...you can follow me and and my foodie adventures!


And so, it is farmers market season again, and I don't know about you but I love walking around the farmers markets! The one in walking distance from my office just started last Thursday and will be every Thursday through the summer. I walked up on Thursday to get a juice from one of my favorite juice bars, Zia's Cafe, and ended up walking around and buying some zucchini.  


I had all this zucchini and needed to use it up, since I am the only one that really eats it in my house, I invited a friend over to help me eat it up. I made a Zucchini and Mushroom Bake, very close to a crustless quiche.

Zucchini & Mushroom Bake


Ingredients:
4 small zucchini
1/2 medium onion
1 to 1 1/2 cups mushrooms
1/2 tsp herbamare
8 eggs
1/2 cup milk
1/8 cup each shredded cheddar cheese, Gouda, and ricotta salada (feta or goat cheese would work also)
Salt and pepper to taste

Slice the zucchini, onions and mushrooms. Saute the onions and mushrooms just until soft (you can add the zucchini if you would like, I did not.) 

Grease a 9" pie pan, layer the zucchini, and top with the onion and mushrooms. Sprinkle the herbamare over the vegetables. Add the cheddar and Gouda. 


Beat together the eggs and milk, add a little salt and pepper.  Pour the egg mixture over the vegetables. Sprinkle the ricotta salada over the eggs and bake for about 20 minutes or until firm.


Enjoy! And keep an eye out for me in September at the Meadowlands!!


Will you be at the GFAF Expo? Let me know, I'd love to meet you!

And what are some of your favorite Farmers Market finds during the summer?

Recipe shared on Easy Green Mama, Gluten Free Linky for August 20, 2013

Sunday, April 28, 2013

Mimi's Play Dough

I came across a large canister filled with flour, and me being me struggled to just throw it out. Why throw it out you ask? Well, if I had to take a guess the flour in this canister was at least 6 years old and it was just plain ol’ all-purpose white flour which I don’t use anymore anyway, so…throwing it seemed to be the right option.  Well I sat staring at the flour thinking of all the things I could use it for (I even sent texts my friends to see if they could use it for anything), since it was too old to use for food my mind was instantly thinking crafts.  I thought of homemade modge podge, paper mache, salt dough…then I looked over at my son, sitting at the kitchen table sifting through his poor selection of play dough. My mind was made up…PLAY DOUGH! And of course my little helper was eager to help.


Now you can go on Pinterest and find oodles of different play dough recipes, but I am sticking with my mom’s recipe that she used when I was a kid. (I posted something a few years ago, you can see it here.) I am Gluten-Free, my son is not, and so making the dough using regular flour wasn't a concern for me. BUT, if you child is Gluten-Free then I would substitute the flour; use rice or even GF oat flour. I personally haven’t tried it using other flours but I would assume it would work fine.  (Here is a site called Creative with Kids that shares her gluten free play dough recipe.)


Mimi’s Play Dough

2 cups flour
1 cup salt
4 tsp. cream of tartar
1 tbsp. oil
2 cups water
Food coloring*

Mix all the ingredients in a large pot. Stir and cook over medium heat until the mix pulls away from the sides. Constantly stir! This is an arm workout.  (*If you want to have all one color, add the food coloring to the water and mix in while heating.  If you want multiple colors, once you take the dough out of the pot, divide the dough and knead the food coloring in.)


Once the dough is formed, put on wax paper and knead until smooth.  Store in an airtight container (nothing metal), you could even use old empty play dough containers.


He wanted multiple colors, and we were short on food coloring so the only color he wanted that he wasn't able to get was purple; maybe next time.  We added the food coloring in at the kneading stage, and I let him do the kneading.  You may need to add more coloring as you go if you want a more vibrant color.  

Now go play!

Thursday, April 25, 2013

Creamed Chipped Beef and Biscuits {Gluten Free}

I have been craving this...we would always buy the frozen prepackaged versions and those aren't gluten free (go figure).

Growing up creamed chipped beef was always something we had for dinner, over toast and sometimes biscuits, it was never something we had for breakfast.  It wasn't until my family and I went to visit my father-in-law and he made it for us for breakfast that it really sunk in how easy it is to make.  So...I went out and bought some dried beef.  Yup, the stuff in the jar. {Side note: the jars are really nice and can be used for drinking, and the lid just snaps back so good for trips. Less plastic!} 


Since I have been with my husband we have served chipped beef over biscuits more than over toast.  Which personally I prefer, so now I need to make a gluten free creamed chipped beef and gluten free biscuits.  The chipped beef is super simple, I just replaced regular flour with rice flour. 

Creamed Chipped Beef

2-4 oz. package of dried beef* (I used Hormel)
2 tbsp. butter
2 tbsp. brown rice flour
2 cups milk
1/2 tsp. garlic powder
1/2 tsp. onion powder
pepper to taste

*dried beef is salty, so I would recommend rinsing the beef slightly to remove some of the salt.

Prepare beef, slice into bite size pieces and set aside. Melt the butter in a large skillet, once melted whisk in the flour to make a rue.  Slowly add the milk, continuously whisking to keep from getting any lumps. Continue to whisk the mixture until it thicken to your desired consistency. Add the beef and seasonings, once the beef is heated. Spoon over biscuits.


{Cheater} Gluten Free Biscuits

2 cups Gluten Free Bisquick 
1/3 cup shortening
2/3 cup milk or buttermilk
3 eggs

In a large bowl, cut the shortening into the Bisquick.  Mix in the milk and eggs.  Mix well, drop on an ungreased baking sheet. (The size of the drop will depend on how big you want your biscuits, they don't spread much) Bake for about 10 minutes at 375 degrees.  


Enjoy!